This series of blog posts will share some of the pitfalls associated with the process of signing an internal iOS app for distribution via an MDM like VMware AirWatch. Part 1 covered the Apple Developer Enterprise Account and certificate generation. Part 2 here covers the creation of App IDs and Provisioning Profiles. Part 3 will explain the entitlements.plist and info.plist files. Part 4 covers the actual signing process.
Now that you have your Apple Developer account set up from Part 1 of this series, the next step in the process to deploy an internal iOS app via your mobile device management (MDM) platform is to set up a unique app ID and generate a provisioning profile. This is a fairly easy process, but it's a good idea to understand how these two pieces work in the re-signing process.
To get started here, log into your Apple Developer Enterprise account, then click on the "Certificates, IDs & Profiles" link on the left nav bar. This will take you to a page with another nav bar on the left. You'll begin on the Certificates page and will see the certificate we generated in Part 1.
App ID
The first thing you need to generate is an app ID. To do this, click on "Identifiers" on the left nav bar, then in the next page click the blue plus sign at the top. In the screen that comes up, select "App ID" and click Continue. You should now see the form that has to be completed to generate the app ID. First, make sure you've chosen the appropriate platform, then give the App ID a description.
Next, you'll need to assign the bundle ID. This is the unique ID for the app, and as the page indicates, the best practice is to use a reverse-domain name convention. Let's assume we're trying to deploy a special ToDo app called AcuityToDo. We would probably choose a bundle ID of com.acuitytech.todo as our bundle ID.
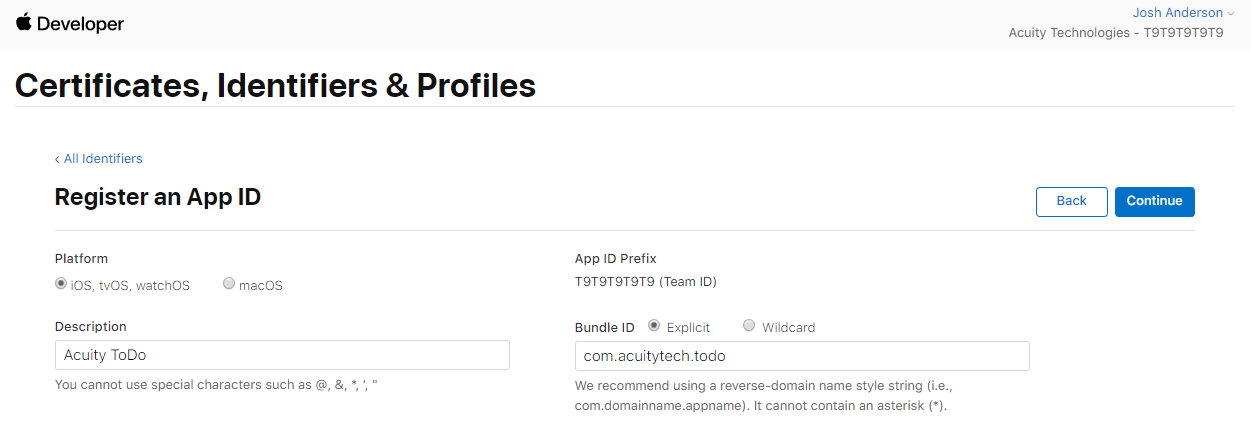
It's important to note that this bundle ID should be unique and fairly descriptive, as devices will use it to determine an app's identity. This ID will also be how your MDM knows how to upgrade the app.
You'll see below the description and bundle ID fields there is a section for capabilities. Your developer should tell you which, if any, need to be enabled for the app. Generally we recommend only enabling the capabilities truly needed by the app.
Once you've completed the form, click Continue at the top, confirm your information one more time, then click Register. You should now see it in the list and can move on to creating the provisioning profile.
Provisioning Profile
To start generating a provisioning profile for your app, click on "Profiles" on the left nav bar, then in the next page click the blue plus sign at the top. You'll see a set of selections to make. It's important to choose the correct profile or you could run into issues when it comes time to actually distribute the signed app. In this series, we're assuming the goal is to deploy an internal iOS app, which would mean we would want to create a Distribution profile for In House distribution. Make that selection then click Continue at the top of the page.
In the next step, you'll need to select the app ID we created above. Select it in the drop-down, then click Continue at the top of the page. In the next page, select the developer certificate you set up in Part 1. Finally, give the profile a name.
When you've done that, click Generate at the top of the page, then click Download to save the profile. The file will have the extension .mobileprovision when you download it. We'll use this in Part 4 when we perform the actual signing of the IPA file.
Provisioning Profile Expiration & Renewal
You'll recall from Part 1 that developer certificates expire every three years. Provisioning Profiles, on the other hand, expire annually. When a certificate expires, any apps signed with it must be re-signed with a new certificate. Provisioning Profiles work a little differently. For an internal app distributed via MDM, you can update the provisioning profile within your MDM without having to do anything with the IPA file.
The process to renew the Provisioning Profile is pretty simple, but not exactly intuitive. You have to go into your Apple Developer Enterprise Account, edit the provisioning profile, then save it without making any changes. At that point, the expiration date will be reset and you'll be able to download the new mobileprovision file.
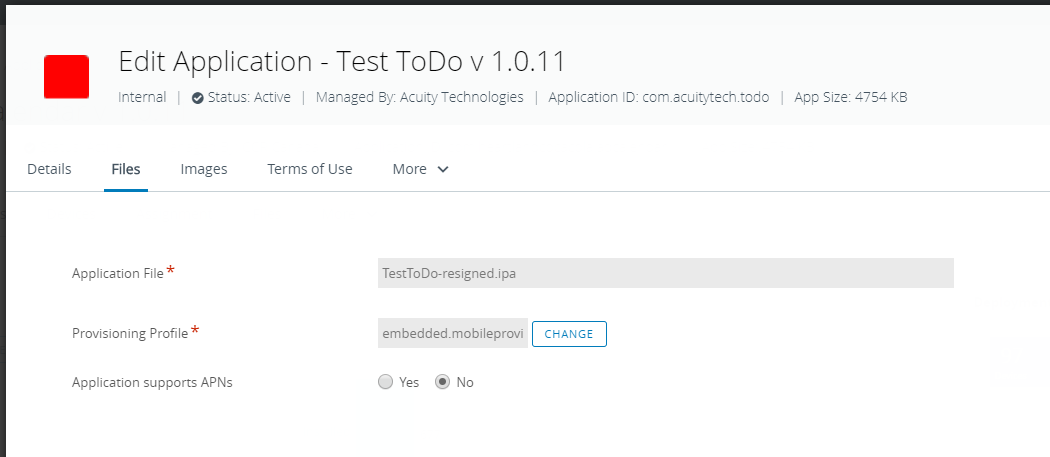
With the updated mobileprovision file, you can then go into your MDM and update the provisioning profile. In AirWatch, this is a simple process. Start by navigating to the Apps & Books section, then click to edit the internal app you need to update. In the edit screen, click on the Files tab. You'll see a "Change" button next to the provisioning profile. Clicking this will allow you to upload the new provisioning profile.
Next Up
Now that you have the developer account and certificate and your app ID and provisioning profile, we can move on to the next components — the entitlements.plist and info.plist files. While these aren't a big step in the signing process, it helps to understand what they do and how they impact the process, since a small mistake in these can frustrate your efforts to successfully re-sign an IPA file. If don't want to risk it, talk to us about our Mobility Managed Services offering. Our MMS clients enjoy full management of private app signing and deployment.